1. はじめに
Amazon API Gateway + AWS Lambda を統合して、API の構築を行った際、Amazon Cognito を活用することによってAPI 認証の設定を行いました。
本記事では、Amazon API Gateway、AWS Lambda、Amazon Cognito で認証機能機能付きのAPI の設定方法について説明していきます。
2. 用語説明
本構築で使用する3つのAWSサービスについて、今回の構成における役割を中心に解説します。
2.1. Amazon Cognito
ユーザーのサインアップやサインイン、認証管理を行うマネージドサービスです。 今回は、ユーザーがログインした際に発行される「IDトークン(JWT)」の検証をAPI Gatewayと連携して行います。
2.2. Amazon API Gateway
あらゆる規模のAPIの作成や管理を簡単に行えるマネージドサービスです。 今回は、 Lambda の手前に配置し、Cognito Authorizer を利用して、有効なトークンを持っているリクエストを検証する。
2.3. AWS Lambda
サーバーのプロビジョニングや管理をすることなくコードを実行できる環境を提供します。
3. 全体構成
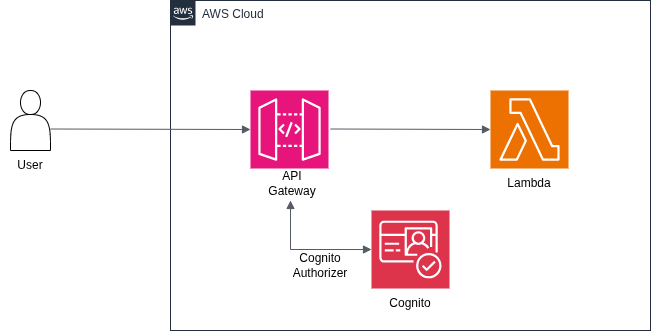
4. 環境準備
本手順を進めるにあたり、ローカル環境に以下の準備・確認を行ってください。
1)Node.js
2)AWS CLI
3)AWS CDK CLI の準備
4)CDKプロジェクトの初期化
5)AWSアカウント
5. 設定
5.1. ディレクトリ構成
以下はMCDK 関連のディレクトリ構成です。その他設定ファイル等は、省略しております。
cdk
├── bin
│   └── cognito_apigateway.ts
└── lib
│   ├── cognito_apigateway-stack.ts
│   └── constructs
│       ├── api
│       │   └── api.ts
│       └── cognito
│           └── cognito.ts
lambda
└──index.py
5.2. Amazon Cognito
ここでは、Amazon Cognito のユーザープールとアプリケーションクライアントの作成を行います。
5.2.1. ユーザープール
Amazon Cognito ユーザープールは、ウェブおよびモバイルアプリケーションの認証と認可のためのユーザーディレクトリです。
5.2.2. アプリケーションクライアント
ユーザープールアプリケーションクライアントは、Amazon Cognito で認証される 1 つのモバイルアプリケーションまたはウェブアプリケーションを操作するユーザープール内の設定です。アプリケーショ>ンクライアントは、認証済みおよび未認証の API オペレーションを呼び出したり、ユーザーの属性の一部またはすべてを読み取ったり変更したりできます。
5.2.3. 設定
ファイルパス:cdk/lib/constructs/cognito/cognito.ts

import { Construct } from 'constructs';
import * as cognito from 'aws-cdk-lib/aws-cognito';

export class CognitoAuth extends Construct {
  public readonly userPool: cognito.UserPool;
  public readonly userPoolClient: cognito.UserPoolClient;

  constructor(scope: Construct, id: string) {
    super(scope, id);

  // ユーザープールの作成
    this.userPool = new cognito.UserPool(this, 'UserPool', {
      userPoolName: 'my-user-pool',
      //ユーザー自身でサインアップができないようにする。
      selfSignUpEnabled: false,
      signInAliases: {
        email: true,
      },
      autoVerify: {
        email: true,
      },
      passwordPolicy: {
        minLength: 8,
        requireLowercase: true,
        requireUppercase: true,
        requireDigits: true,
        requireSymbols: false,
      }
    });

    // アプリケーションクライアントの作成
    this.userPoolClient = new cognito.UserPoolClient(this, 'UserPoolClient', {
      userPool: this.userPool,
      userPoolClientName: 'api-gateway-client',
      // 認証にパスワードを要求する。
      authFlows: {
        userPassword: true,
      },
    });
  }
}
5.3. Amazon API Gateway + AWS Lambda
この章では、Amazon API Gateway + AWS Lambdaの設定を行います。
5.3.1 設定
ファイルパス:cdk/lib/constructs/api/api.ts

import { Construct } from 'constructs';
import * as apigateway from 'aws-cdk-lib/aws-apigateway';
import * as cognito from 'aws-cdk-lib/aws-cognito';
import * as lambda from 'aws-cdk-lib/aws-lambda';
import * as path from 'path';

interface ApiAuthGatewayProps {
  userPool: cognito.IUserPool;
}

export class ApiAuthGateway extends Construct {
  public readonly api: apigateway.RestApi;

  constructor(scope: Construct, id: string, props: ApiAuthGatewayProps) {
    super(scope, id);

    // Lambdaの作成
    const lambdaCodePath = path.join(__dirname, '..', '..', '..', '..', 'lambda');
    const backendLambda = new lambda.Function(this, 'BackendLambda', {
      runtime: lambda.Runtime.PYTHON_3_13,
      code: lambda.Code.fromAsset(lambdaCodePath),
      handler: 'index.handler',
    });

    this.api = new apigateway.RestApi(this, 'MyApiGateway', {
      restApiName: 'SecureApi',
      description: 'Cognitoで保護されたPython APIモジュールです',
      defaultCorsPreflightOptions: {
        allowOrigins: apigateway.Cors.ALL_ORIGINS,
        allowMethods: apigateway.Cors.ALL_METHODS,
        allowHeaders: ['Content-Type', 'Authorization'],
      },
    });

  // Cognito Authorizer の設定
    const authorizer = new apigateway.CognitoUserPoolsAuthorizer(this, 'ApiAuthorizer', {
      cognitoUserPools: [props.userPool],
      authorizerName: 'MyCognitoAuthorizer',
      identitySource: 'method.request.header.Authorization',
    });

    // Amazon API Gateway のエンドポイント作成
    const dataResource = this.api.root.addResource('data');
    dataResource.addMethod(
      'GET',
      new apigateway.LambdaIntegration(backendLambda),
      {
        authorizer: authorizer,
        authorizationType: apigateway.AuthorizationType.COGNITO,
      }
    );

  }
}
5.3. スタック(Stack)の定義
作成した各コンストラクト(Cognito と API Gateway)を組み合わせ、1つのAWS CloudFormationスタックとして定義するメインファイルです。
lib/cognito-apigateway-stack.ts などのメインスタックファイルを以下のように記述します。
import * as cdk from 'aws-cdk-lib';
import { Construct } from 'constructs';
import { CognitoAuth } from './constructs/cognito/cognito';
import { ApiAuthGateway } from './constructs/api/api';

export class CognitoApigatewayStack extends cdk.Stack {
  constructor(scope: Construct, id: string, props?: cdk.StackProps) {
    super(scope, id, props);

    const cognitoAuth = new CognitoAuth(this, 'CognitoAuth');

    const gateway = new ApiAuthGateway(this, 'ApiGatewayModule', {
      userPool: cognitoAuth.userPool,
    });

  }
}
5.4. アプリケーション(App)のエントリーポイント
CDKプロジェクト全体の実行起点となる、エントリーポイント(App)ファイルです。
通常、bin/ ディレクトリ配下(例: bin/cognito_apigateway.ts)に配置され、CDKコマンド(cdk deployなど)を実行した際に最初に呼び出されます。
#!/usr/bin/env node
import * as cdk from 'aws-cdk-lib';
import { CognitoApigatewayStack } from '../lib/cognito_apigateway-stack';

const app = new cdk.App();
new CognitoApigatewayStack(app, 'CognitoApigatewayStack', {});
5.5. Lambda(疎通確認用コード)
lambda/index.py のソースコードで、疎通確認できた場合、以下のメッセージを返却
- メッセージ内容
- 認証成功!ようこそ {email} さん(Python 3.13)
import json

def handler(event, context):
    authorizer = event.get('requestContext', {}).get('authorizer', {})
    claims = authorizer.get('claims', {})

    # トークンからメールアドレスと所属グループを取得
    email = claims.get('email', '不明なユーザー')
    # 認証成功時のレスポンス
    return {
        'statusCode': 200,
        'headers': {
            'Content-Type': 'application/json',
            'Access-Control-Allow-Origin': '*' # CORS対応
        },
        'body': json.dumps({
            'message': f'認証成功!ようこそ {email} さん(Python 3.13)',
            'yourGroups': group_list
        }, ensure_ascii=False)
    }
6. APIの疎通確認
6.1. 未認証でAPIを呼び出す
認証情報をもたせずにコールすると、認証エラーが出力される。
curl -X GET https://zzzzzzzzz.execute-api.us-west-2.amazonaws.com/prod/data
{"message":"Unauthorized"}
6.2. Amazon Cognito から認証情報取得
※事前に作成したユーザープールでユーザー作成を行ってください。
$ aws cognito-idp initiate-auth \
  --auth-flow USER_PASSWORD_AUTH \
  --client-id <アプリケーションクライアントのID> \
  --auth-parameters USERNAME=<ユーザー名>,PASSWORD=<パスワード>
{
    "ChallengeParameters": {},
    "AuthenticationResult": {
        "AccessToken": <アクセストークン>,
        "IdToken": <IDトークン>
    }
}
6.3. 認証情報を付与した上で疎通確認
6.2. Amazon Cognito から認証情報取得 で取得した IDトークンをAuthorizetionの項目に入力した上で、curl コマンドを実行する。
$curl -X GET https://zzzzzzzzz.execute-api.us-west-2.amazonaws.com/prod/data \
  -H "Authorization: <IDトークン>"
{"message": "認証成功!ようこそ <ユーザー名> さん(Python 3.13)", "yourGroups": []}k
7. おわりに
今回は、Amazon Cognito と Amazon API Gateway を利用してAPI 認証の設定について学びました。
Amazon Cognito と Amazon API Gateway で必要な設定をしてしまえば、開発者側が認証処理を実装せずに済みます。
そのため、開発プロセスを短縮できるので、Amazon Congnito を利用できるケースであれば、どんどん活用していこうと思いました。
7. 参考
aws-cdk-lib.aws_apigateway module
aws-cdk-lib.aws_cognito module
AWS CDK の開始方法
チュートリアル: 最初の AWS CDK アプリを作成する